top of page
APPS AND PROJECTS


"My Street" (Android - Java)

I am currently working on an extension of Josiah Acheampong's idea, a longtime friend of mine. This Android application will allow users to report local infrastructure issues like malfunctioning streetlights and potholes to the proper authorities. The app will send a picture (optional), Location (required), and a comment (optional) to a Google Firebase Realtime Database (Location and Comment) and Google Firebase Storage (Picture). Camera is powered by the FotoApparat Camera Library.


Users are required to sign up to use this application (handled by Google Firebase Authentication) and all reports are stored under the unique user ID and viewable to the proper authorities. Crash reporting is handled by Crashlytics.


Download the current version below.

Current .apk file (May 2020):

https://drive.google.com/file/d/0BzBTms3rAUcWWERsNmh6d1BjTlk/view?usp=sharing


"Audio Memo" (Android - Java) - College Senior Project


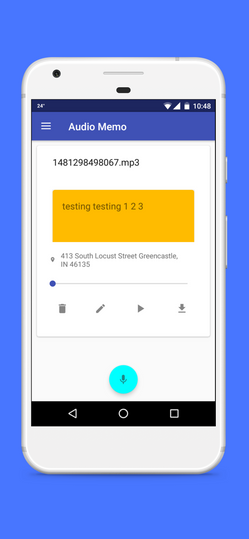
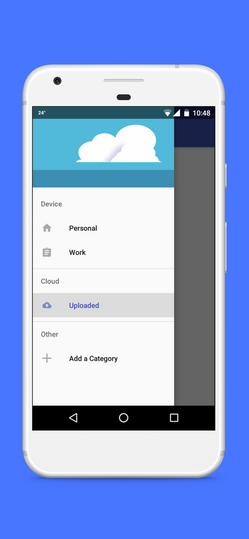
I worked on a mobile app that allows the user to record voice memos. Memos are also transcribed and kept along with the audio files, for use for people with hearing problems or in an environment that demands quiet. The user can also record or upload memos to Google Firebase Storage and interact with their memos from there.

Github

https://github.com/gowiredu/AudioMemo2


Current .apk file

https://drive.google.com/file/d/0BzBTms3rAUcWNGZ3dGxZcmQ5ckU/view?usp=sharing


"Simple Notepad" (Android - Kotlin) - Play Store


I developed a SQLite Notepad Android application called "Simple Notepad". Users can quickly record their thoughts in a small, lightweight notepad application. This application also supports "TalkBack", an Android accessibility feature for the visually impaired.

Play Store:

https://play.google.com/store/apps/details?id=com.gowiredu.notepad


"Escape Artist" - Text-Based Adventure Game (Java)

Using the Eclipse IDE, I and three other people created a text-based adventure game called "Escape Artist". The goal of the game is to search for the right items needed to get through the exit of the campus art building.

Github

https://github.com/gowiredu/SD-HW3--2-


Arduino Project 1 (“Knight Rider” lights)

A LilyPad Arduino has 3 LEDs and a buzzer connected to it. It also has two disconnected alligator clips acting as a “button”. The Arduino illuminates a new LED each time one alligator clip touches the other. Once all 3 LEDs are lit, another “button press” turns all of them off.

When the button is pressed once, the first LED turns on and the buzzer emits a sound. When the button pressed a second time, the second LED turns on, this time with no sound. When pressed one more time, the third LED turns on and the buzzer emits a sound, this time at a higher frequency. After the fourth button press, all LEDs and sound turn off.


More about the project

https://drive.google.com/file/d/0B6gT0btW3veNTzZxUXk2VDdiUEk/view?usp=sharing


Ardublocks File

https://www.dropbox.com/s/363wn6jocf44hc9/Knight%20Rider%20Lights.abp?dl=0


Fritzing File (Circuit Diagram)

https://www.dropbox.com/s/zcob2lo1vwtcsi1/Knight%20Rider%20Fritzing.fzz?dl=0


C Code (Arduino File)

https://www.dropbox.com/s/0ka7z169ana9z77/Knight_Rider_Lights_-_C_Code.ino?dl=0

Arduino Project 2 (LED and music)

The Arduino is connected to four LEDs. The buzzer is connected through one of the digital pins. The first LED turns on, then the second, third, and fourth. Before each LED lights up, the Serial Terminal is supposed to let the programmer know what LED is about to light up (ex: LED on pin (9) turns on).


More about the project

https://drive.google.com/file/d/0B6gT0btW3veNbmVGWGRVQk0xdVU/view?usp=sharing


Video of the Project

https://drive.google.com/file/d/0B6gT0btW3veNb1YtVkVsMHZHVzg/view?usp=sharing


Ardublocks File

https://www.dropbox.com/s/81v0vuwenl36kye/HW3%20Part%202.abp?dl=0


Fritzing File (Circuit Diagram)

https://www.dropbox.com/s/9xp2g6smk5kj1b9/Gordon%20Owiredu%20-%20Fritzing%20HW3%20%28Part%202%29.fzz?dl=0


C Code (Arduino File)

https://www.dropbox.com/s/9mn3lto9cge7r6b/HW3_Part_2_-_C_Code.ino?dl=0


Arduino Project 3 (Light Sensor and Button)

The first part of the code turns an LED on or off depending on how much light there is in the room. The Arduino first uses a light sensor to check how bright or dark the room is. If it is below a certain level of brightness, the LED lights up else, the LED turns/remains off. The second part of the code turns an LED on if a button is pressed and off if the button is released. The Arduino checks to see if the button is pressed. If it is, the LED turns on. If not the LED turns/remains off.


More about the project

https://drive.google.com/a/depauw.edu/file/d/0B6gT0btW3veNaU9LUkJnanZ1ZFU/view?usp=sharing


Video

https://drive.google.com/file/d/0B6gT0btW3veNbWJJcW9YaGU2ckE/view?usp=sharing


Ardublocks File

https://www.dropbox.com/s/t73duzl3ynyqfla/Light%20Sensor%20and%20Button.abp?dl=0


Fritzing File (Circuit Diagram)

https://www.dropbox.com/s/4u4j3b42f6dyk4p/Gordon%2C%20David%2C%20Benton%20-%20Brightness%20and%20Button%20Press.fzz?dl=0


C Code (Arduino File)

https://www.dropbox.com/s/1xkxvjwm9lexdnc/Gordon_-_David_–_sensor-buttonpress.ino?dl=0


Arduino Project 4 (“Sitting” detection)

An LED turns on when a button is pushed (when the person sits down). When the button is pressed, the time held down is displayed on the serial monitor. A new LED turns on every 30 seconds. A buzzer sounds the moment the last LED turns on.


More about the project

https://drive.google.com/file/d/0B6gT0btW3veNSU5uNnlGRFdEU2c/view?usp=sharing


Video

https://drive.google.com/file/d/0B6gT0btW3veNZkFkckN4ZURNR28/view?usp=sharing


Ardublocks File

https://www.dropbox.com/s/z9kcpq4jzyuwmoz/Sitting%20Button%20Press%20Buzzer.abp?dl=0


Fritzing File (Circuit Diagram)

https://www.dropbox.com/s/hhfbr4t3k3glr00/Sitting%20Button%20Press%20Buzzer.fzz?dl=0


C Code (Arduino File)

https://www.dropbox.com/s/dlsjqulim16didg/Sitting%20Button%20Press%20Buzzer.ino?dl=0


Arduino Product Final Version (“SitFit”)

We assembled our device using the prototype sketch and named it “SitFit.” This wallet-sized product is designed for use in a person’s rear pocket. The device is made with a LilyPad Arduino, a button, a buzzer, and a 3D printed button cover to help dissipate some of the pressure on the button when the user sits on it. This device seamlessly slides into a person’s rear pocket and gathers information on how long that person sits during their day.


When the person sits, a button in the product is pushed and the Arduino begins gathering information. When connected to a computer via mini USB, the total time spent sitting is displayed on the screen. A buzzer is also connected to the Lilypad Arduino. This buzzer emits a sound when a person sits for a certain period of time so they know when they need to take a break. This time can be edited by the user.


We had a trial run with our device. We had one of our group members put the device in his pocket on his drive back to campus and for the rest of the night as he watched a few episodes of his favorite shows on television. The device worked as we intended. The LilyPad collected and held on to all the data and displayed it on the screen when connected to a computer via mini USB. The button and its 3D printed cover too both worked as we intended.


The button’s 3D printed cover helped dissipate some of the pressure our group member was applying to it and as a result the button was not damaged. The buzzer also worked as intended and emitted a sound when our group member sat down for too long.


More about the project (Presentation)

https://drive.google.com/file/d/0B6gT0btW3veNQklmZmhIT2ktTlE/view?usp=sharing


Blueprint of Final Product (Picture)

https://drive.google.com/file/d/0B6gT0btW3veNWlk0VWZBZF85UFE/view?usp=sharing


Blueprint of Final Product (File)

https://www.dropbox.com/s/guqbqid8327mlra/Arduino%20Final%20Prototype%20Drawing.pdf?dl=0


Images of the Final Prototype

https://drive.google.com/folderview?id=0B6gT0btW3veNRG1TQnFYdkUwLWs&usp=sharing


Machine Learning “Sitting” Survey

I came up with factors I thought contributed to an individual sitting for extended periods of time during the day then got together with my group and agreed with them on top 5 factors out of all the factors we all came up with. I then made the necessary corrections and created some survey questions based off those factors.


Survey

https://docs.google.com/a/depauw.edu/forms/d/1eafV2cH1WVytIsbtqFybKpjr9OUv4e49vEIBHbC66H4/viewform


Data Analysis with “Weka” (Machine Learning)

We used a program called “Weka” to analyze the results of our survey. We first preprocessed the data. Different groups asked different questions in their surveys so we had to find and use questions we had in common. Another bit of preprocessing we had to do was capitalize things that were not capitalized in other surveys and vice versa to help keep things orderly. After all of this, we loaded the data it into Weka and began our analysis.


More about this project (results of the survey and Weka Tree)

https://drive.google.com/file/d/0B6gT0btW3veNWWlLSlZDYmxIa2s/view?usp=sharing


“Weka” File (.CSV File)

https://www.dropbox.com/s/y04y590fy60inbt/SurveyData%20-%20Sheet1.csv?dl=0


Microsoft Excel File

https://drive.google.com/file/d/0B6gT0btW3veNaU5ESkZtZDdzT2c/view?usp=sharing


Machine Learning using “Tableau” Software (Continuation of Machine Learning Project)

After surveying people both in person and online, we got together and discussed our data. Some people asked slightly different questions in their surveys so we used only the question our surveys had in common. After collectively organizing the data in our group Microsoft Excel File, we used a program called “Tableau” to create a chart with that data.


Tableau File

https://www.dropbox.com/s/xiq6hkg4zloc4y0/Gordon%20Owiredu%20-%20HW5%20%28Part%202%29.twb?dl=0


Dataset (Excel File – Needed to open Tableau File)

https://drive.google.com/file/d/0B6gT0btW3veNeVV1YzF2ZTF3dGs/view?usp=sharing


Picture of the chart

https://drive.google.com/file/d/0B6gT0btW3veNWGdsYTBfZGRGRVU/view?usp=sharing


Low Fidelity Arduino Prototype (for final project)

We sketched a prototype of our final project. We decided where the buzzer, button, and other components would be placed and sketched our prototype.


Sketch of Prototype

https://drive.google.com/file/d/0B6gT0btW3veNZXNBTU9NMkw1NlU/view?usp=sharing


About the sketch

https://drive.google.com/file/d/0B6gT0btW3veNMUZFd2RFSU5uM3c/view?usp=sharing


bottom of page